
Published Date: May 1, 2026 | Last Updated: May 13, 2026
About: This article covers connecting SaaS applications and other integrations after the IDP is in place. By the end, the Administrator will have all target applications connected, verified, and syncing into Tello IAM.
Why additional integrations come after the IDP and HR system
The IDP and HR integrations connected in Part 2 established the User directory — the people Tello IAM manages. Additional integrations are the applications those Users will be provisioned into. Connecting them now, before Role Templates are configured, ensures that when User records are reviewed in the next step, they reflect the complete picture of every permission each User holds across every connected system. That complete picture is what makes Role Template design accurate in Part 5.
Important: Connect all integrations before designing Role Templates. If an integration is missing at the time a Role Template is built, the template will not include that application and you will have to manually add it later.
Integration types
Tello IAM supports 2 primary integration connection methods. The method required depends on the application being connected:
- OAuth — the Administrator authorizes Tello IAM to connect by signing in to the target application and granting permissions. No API key is required. Microsoft Entra ID, Microsoft 365, and Google Workspace are examples of OAuth integrations.
- API key / credentials — the Administrator provides an API key or service account credentials generated in the target application. HubSpot and Slack are examples of API-based integrations.
The connection method and specific requirements for each integration are documented in the Integrations reference library. Refer to the relevant guide before beginning each connection.
Connect each additional integration
The Add Integration flow is the same process used in Part 2. For each integration:
- Navigate to Integrations in the left navigation.
- Select + Add Integration.
- Locate the application in the catalog and select it.
- Follow the on-screen setup steps. Refer to the corresponding integration guide for credentials and configuration details specific to that application.
- Complete the setup. Tello begins an initial sync with the connected application.
Repeat this process until all applications the organization uses are connected. The goal is to have every system Tello will manage represented before proceeding to Part 5.
Verify each connection
After connecting each integration, confirm it is active and syncing before moving to the next.
On the Integrations page, each connected application displays a current status and the timestamp of its most recent sync. A status of Active indicates the integration is connected and syncing correctly. If a newly connected integration does not show as Active, select Sync Now to trigger a manual sync. If the status does not update to Active, review the integration's authorization settings and consult the corresponding integration guide.
Review detected permissions
Once all integrations are connected and syncing, User records on the Users page update to reflect detected permissions across every connected application. The Access column displays icons for all applications each User has been detected in.
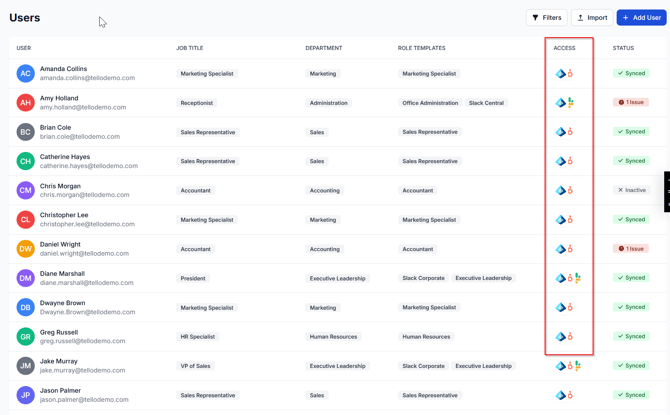
Review a sample of User records and confirm that detected permissions are appearing as expected across the newly connected integrations. If a User's access in a specific application does not appear, confirm that the sync completed and that the User's account exists in that application.
With all integrations connected, each User record now reflects a complete view of that User's existing access across every system Tello IAM manages. This is the data used to design Role Templates in Part 5.
Confirmation
The Administrator is ready to proceed when all of the following are true:
- All target applications are connected and display a status of
Activeon the Integrations page - Each connected integration shows a recent successful sync timestamp
- Detected permissions across all integrations are visible on User records in the Users page
Next steps
This article is Part 4 of the Getting Started with Tello IAM series.
Next: Getting Started Part 5: Planning your role template structure
Previous: Getting Started Part 3: Verifying your user data
Getting Started series
- Platform Overview
- Connecting your IDP and HR integrations
- Verifying your user data
- Connecting additional integrations (current)
- Planning your Role Template structure
- Configuring Role Templates
- Configuring Teams
- Monitoring access with Change History, Access Overview, and Reports
 Seasoft Security Solutions LLC | TelloIAM